![Comparing WooCommerce Payment Gateways [examples + how to]](https://cdn.prod.website-files.com/61c2fe5939d339761cefc871/61cc4988c624bb6338d9bbb3_StockSnap_71MH9ATF4S.jpeg)
There are many ecommerce platforms out there, but WordPress and WooCommerce are the premiere platforms to build an online store. There are also loads of WooCommerce payment gateways that let you accept customer payments, but all have their limitations.Your customers don’t want limitations though. When they find that perfect product, service, or another offering in your store, you don’t want to leave them hanging when it comes time to pay. And it’s not as simple as enabling PayPal payments. You have to consider things like geography, transaction fees, security features, and so on when assessing your options. The following guide to setting up WooCommerce payment gateways will cover everything you need to know to navigate this delicate part of ecommerce, including:
- The various factors to consider before adding a payment gateway in WooCommerce.
- The 5 best payment gateways you should use for fast, easy, and secure checkouts.
- How to quickly and seamlessly integrate a payment gateway into your WooCommerce store.
Don’t let all that hard work on your ecommerce site go to waste. Take the time to research and do a payment gateway comparison first.
Critical Factors to Consider when assessing Woocommerce Payment Gateways
Surprisingly, it’s not what you intend to sell through your WooCommerce site that can stop visitors committing to purchasing items in their shopping carts. After all, they entered your online store for a reason.No, instead, it’s the experience while making a purchase that can lead a visitor to abandon it entirely. There’s so much at stake when you leave visitors to browse your online store and manage their own purchases. This means that it's important your online store is set-up to have the best conversion rate it possibly can. One way to do that, it to think long and hard about the WooCommerce payment gateway you decide to use.The following list of considerations will help you narrow down the choices and get you closer to finding the perfect payment gateway solution for your WooCommerce website.
Cost
There are a surprising number of free WooCommerce payment gateway extensions available. That said, none of them are free to actually use. Before you consider any other factors, first consider what it’s actually going to cost you to process payments through your chosen gateway. Here are some of the costs you’ll need to factor in:
- The cost of the extension or plugin.
- The payment gateway signup fee.
- Monthly or yearly fees assessed for long-term use.
- Fees paid per transaction (typically, a percentage of your total revenue).
- Dispute or rejected transaction fees.
WordPress and WooCommerce may be free to use, so you might not be in the habit of considering tools that cut into your profit margins. However, when it comes to a payment gateway, there is no such thing as free. Be sure to take some time to think about how those additional costs will affect your overall profits and cash flow.You may need to adjust product pricing to compensate for the security and efficiency that comes from using a payment gateway.
WooCommerce Compatibility
If you’re reading this, then you’re most likely using WooCommerce to power your online store. While there are WordPress payment plugins available, it’s best to start your search for the best payment gateway with WooCommerce extensions. For starters, these extensions were made specifically to work with WooCommerce, so you know you won’t run into trouble with plugin compatibility. And, if you hit some problems along the way, each comes with a thorough set of documentation as well as support from WooCommerce:
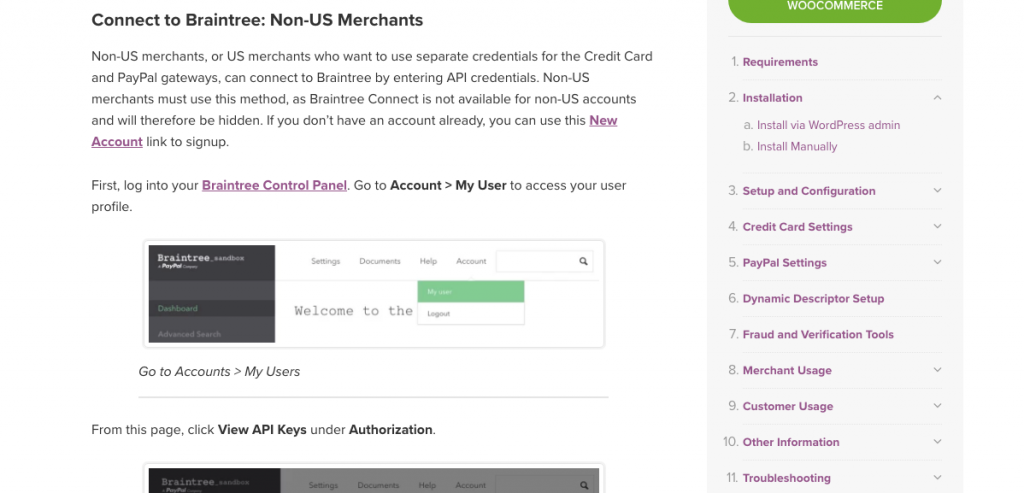
Also, most WooCommerce payment gateways are made by all the biggest names. If you can get everything you need from one source, why bother spending time looking around elsewhere?
Ease of Use
There are two users whose experience you will need to consider:
- Your own (or the developer that will set up the gateway for you),
- Your customer (the most important of the two).
First, look at how easy the gateway is to set up.
- Does it require coding on the backend?
- Is it as simple as downloading a plugin and uploading into WordPress?
- What about configuring advanced settings?
If you’re a business owner hoping to go the DIY route, you’ll want to look for WooCommerce payment gateways built for you. As for the end user, this depends on how exactly you want to customise the checkout experience for them.
- Do you want to allow for guest checkout?
- How about social media logins?
- How many steps or pages do you need them to complete?
Configurability should be an important consideration. This ensures your users still get an optimal experience even if you’re not the one controlling it.
Payment Gateway Type
You may be surprised to learn this, but not all payment gateways are handled the same way. Therefore, the best payment gateway for you will depend on your business model. You’ve probably even encountered this in your own purchases as a consumer. In general, they can be broken into the following types of payment gateway:
- Offline: These are the core payment options you can offer by default through WooCommerce. They include bank transfers, cheques, and cash on delivery (COD).
- Hosted: Hosted payment gateways are ones that process payments outside of your WooCommerce website and instead on the payment processor’s server. There are generally two ways in which you can integrate this into your site. You can embed an iFrame containing the third-party’s checkout process. Or you can add a button to your site that directs visitors off your site and to the payment gateway.
- Integrated: Integrated (or direct) payment gateways are served right on your site. This means that the checkout exists right within the site, all payment information is captured there, and payments are processed there as well.
Now, if you’re nervous about the user’s experience being disrupted, you may want to stick to Offline and Integrated payment options. That said, there is a tradeoff. By accepting payments from your WooCommerce site, you become responsible for implementing all security and Payment Card Industry (or PCI) compliance protocols to keep your customers’ financial data safe. So, you have to decide what is most important to you.
Payment Methods (for the Customer)
In a Statista survey from 2017, they found the following payment methods to be the most popular among global consumers:
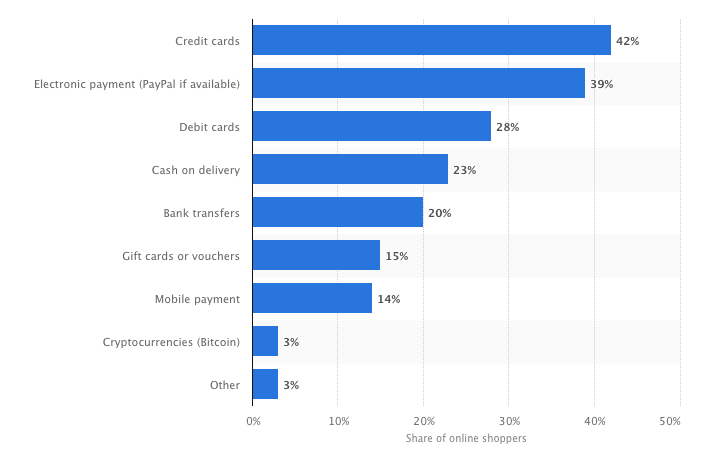
Although the specific breakdown of preferred payment methods may differ based on your site’s particular audience, this data does clearly indicate that there is a good mix of payment types consumers want to see. Credit cards and electronic payment methods like PayPal are definitely a must. Debit cards, COD, and bank transfers would also be nice to include if you find that your visitors want them.
Payment Methods (for you)
Have you ever heard of a merchant account before? Some payment gateway providers require you to have one before you can start collecting payments. A merchant account is an account you set up with a bank that allows a business to collect payments by credit or debit card. You’ll be charged various fees for using one (as you also will when using a payment gateway). However, a merchant account typically comes with more insurance against things like payment fraud and chargebacks, which is why some sellers choose to have one.Now, not every payment gateway requires you to have a merchant account. Instead, they will deposit payments into an account within their own system, which you can then shift over to any other account you want. Without a merchant account, you have more control over when you have access to your funds and where they are deposited. As a result, though, you will have to pay a higher processing fee as the gateway provider is now in charge of holding funds on your behalf.
Locations
Most WooCommerce payment gateways have some sort of restriction on which countries they will accept and process payments on behalf of. So, the first thing to check is that your home country is on their approved list. Then, you’ll want to see if they accept payments from the majority of countries you conduct business in.There is also the issue of location-related taxes to consider. For instance, the VAT or GST tax does not apply in every country. If you need to be able to collect this tax on payments, make sure it’s an included option.
Currency
This goes hand-in-hand with the location factor. Not every WooCommerce payment gateway will accept payments in any global currency. So, again, use what you know about your business and your customers’ demographics to decide what exactly you will need from the payment gateway.
Security
It’s headlines like these--“Hackers target e‑commerce sites to swipe payment data”--that scare consumers away from online shopping. And with good reason. When developers fail to take the necessary precautions to protect the ecommerce sites they’ve built, it puts everyone at risk. If you want to increase consumer confidence, you need to ensure security is prioritized at checkout as this site has done:
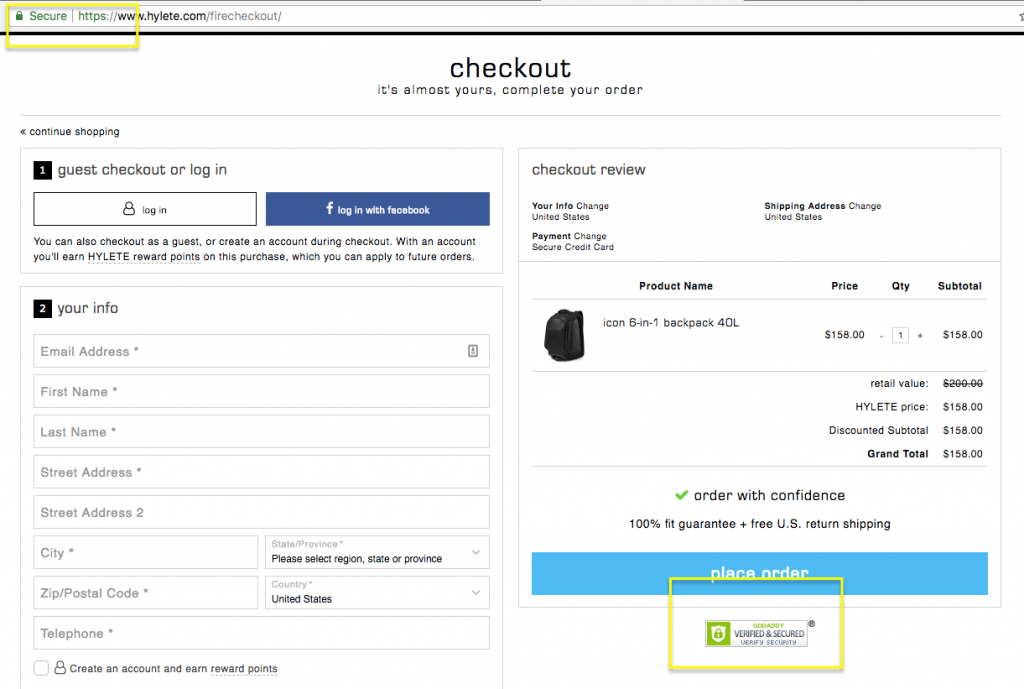
For many online vendors, security is one reason why they decide to outsource payment processing to the payment gateway provider’s website. So long as the payment gateway abides by the rules of PCI compliance and secures their payment processing portal with firewalls and encryption, your customers’ data should be safe. That said, there’s nothing that says you cannot do the same on your own site. In fact, even if you do outsource payment processing, your website should still have an SSL certificate, malware, and other security measures in place. This will prevent unnecessary security breaches from occurring.
Performance
The last thing to think about is the performance of your WooCommerce payment gateway. After all, if your visitors aren’t willing to wait more than a few seconds for a web page to load, there’s no way they'll wait any longer when it comes to the final step. So, you need a payment gateway that will get them through the process and accept their payments quickly and easily. As for what you can do to speed things along, make sure you’re using a WooCommerce hosting service that’s built to handle the activity associated with high volumes of traffic. This will keep visitors moving speedily along until they get to the point where your payment gateway provider takes over. Then, make sure your payment gateway provider seamlessly integrates with both WooCommerce and WordPress. This will keep your server from having to process additional HTTP requests when an API becomes involved.
5 Best WooCommerce Payment Gateways
Now that you know what to look for, it’s time to look at what your options are. Keep in mind that you do not need to find that one perfect Goldilocks of WooCommerce payment gateways either. Ideally, you will find one that offers the most options and best experience for your users. You can then fill in the gaps with others if you feel they would encourage more visitors to buy something on your site. Here are the 5 best payment gateway options for WooCommerce and everything you need to know to make a decision:
1. Authorize.net CIM

The WooCommerce Authorize.net plugin is a great payment gateway if your goal is to wow a global customer base with how convenient and easy your checkout process is. You will keep customers on the site, process all major credit or debit cards, and create a more convenient experience with features like saved payment information, smart mobile keyboards, and subscription options.Cost:
- WooCommerce extension = $79.00 (for one website)
- Monthly gateway fee = $25.00
- Per-transaction fee for payment gateway and merchant account = 2.9% + $.30
- Per-transaction fee for payment gateway = $.10 (+ $.10 batch fee)
Gateway Type: Integrated Payment Methods: All major credit and debit cards as well as eChecks.Geo: They accept payments from all customers worldwide.Security: The WooCommerce authorize.net plugin is a PCI compliant payment gateway. As such, they also require you as a user to have an SSL certificate installed on the site prior to installing the gateway.Get the Extension
2. Stripe
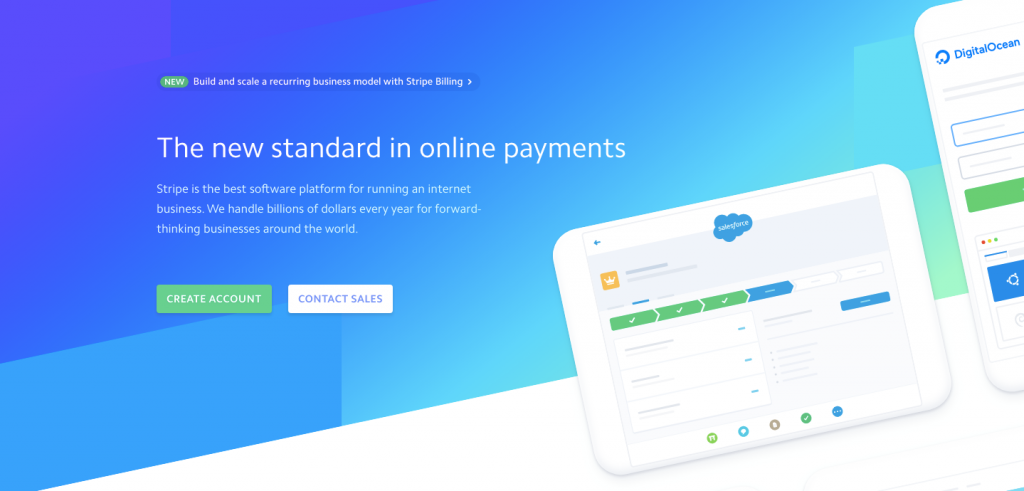
The first thing you should know about Stripe for WooCommerce is that it is a developer-first platform. Even with a WooCommerce extension for integration, the process of using the Stripe payment gateway will go much more smoothly in the hands of a web developer. That said, if you do end up using this, get excited about the simple (and low cost) fee structure as well as its mobile-friendliness (if you have a lot of customers on the go).Cost:
- WooCommerce extension = Free
- Monthly gateway fee = None
- Per-transaction fee = 2.9% + $.30
- International credit card fee = Additional 1%
- ACH debit payment fee = 0.8% + $5
Gateway Type: Integrated Payment Methods: Stripe accepts payments from all major credit cards, debit cards, Apple Pay, Android Pay, as well as some local payment options (like China’s Alipay). Geo: Stripe accepts over 135 currencies from 25 countries and will automatically convert currencies based on your user’s selection.Security: Stripe is PCI compliant and also requires users to have an SSL certificate installed. Get the Extension
3. Braintree

The best PayPal plugin for WordPress is Braintree. Although you could use a plugin that allows you to accept just PayPal payments, you’d be severely limiting yourself. With Braintree, a PayPal-powered service, you can accept PayPal payments along with a whole host of other options in WooCommerce. As an added bonus, it comes with anti-fraud protection. Braintree, WooCommerce and Paypal are a killer combination and without a doubt, Braintree is the best PayPal plugin for WordPressCost:
- WooCommerce extension = FreeMonthly gateway fee = None
- Per-transaction fee for PayPal = None
- Per-transaction fee for credit cards, Venmo, or digital wallets = 2.9% + $.30
- Per-transaction fee for ACH debit = 0.75% (maximum fee is $5)
Gateway Type: Integrated. Payment Methods: Braintree processes PayPal, all major credit cards, Venmo, digital wallets, as well as ACH debit cards.Geo: Accepts payments from over 45 countries and in over 130 currencies.Security: The Braintree WooCommerce payment gateway is encrypted and, upon signing up, you also receive anti-fraud tools built in your platform. Get the Extension
4. Amazon Pay

As you can imagine, having a well-recognized and trusted name like Amazon attached to your checkout process goes a long way with your customers. Not only does the brand recognition put them more at ease in terms of completing the payment process, but the process of checking out will also feel very familiar. If your ecommerce site is new and you’re looking for leverage, Amazon Pay is a great choice. Cost:
- WooCommerce extension = Free
- Monthly gateway fee = None
- Domestic (U.S.) per-transaction fee = 2.9% + $.30
- International processing fee = 3.9%
Gateway Type: Integrated. Payment Methods: Since this syncs to the user’s Amazon account, they can use any payment methods configured there. These include all major credit and debit cards, U.S-based bank payments (cheque), or an Amazon store credit card. Geo: Amazon Pay only works in the following countries: Denmark, Hungary, France, Germany, Italy, Japan, Luxembourg, Netherlands, Portugal, Spain, Sweden, UK, and the USA.Security: Amazon offers PCI compliance and fraud protection for both the buyer and merchant. An SSL certificate is required in order to use this payment gateway. Get the Extension
5. 2Checkout Inline Checkout
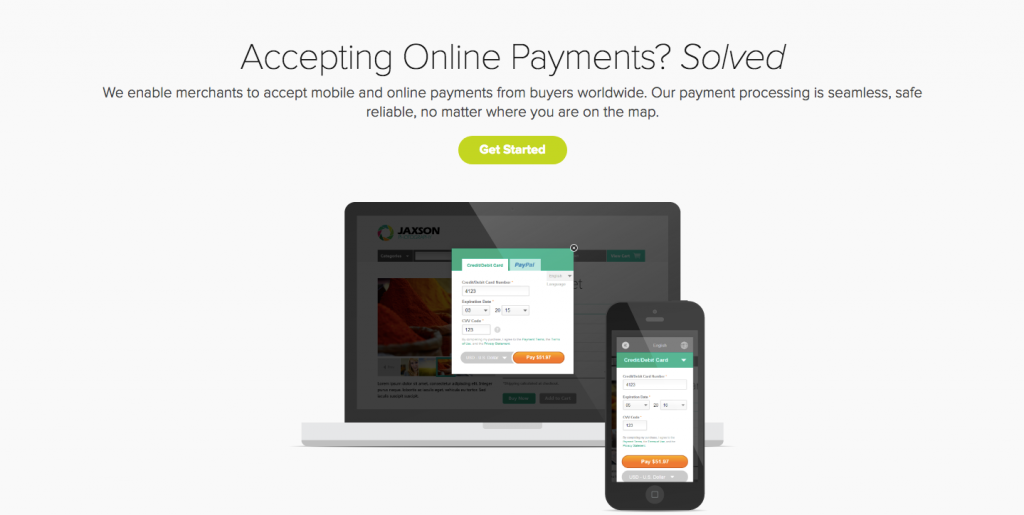
Interested in having someone else handle the security side of payment processing? 2Checkout is the payment gateway for you then. And even though this is a hosted payment solution, 2Checkout keeps the checkout process on your site within an embedded iFrame that you can customize to your liking. Cost:
- WooCommerce extension = $79 for a single site
- Monthly gateway fee = None
- Domestic (U.S.) per-transaction fee = 2.9% + $.30
- International processing fee = 1%
Gateway Type: Hosted, but inline (meaning it shows up in an iFrame). Payment Methods: 2Checkout accepts a wide variety of payment types: credit cards, debit cards, PayPal, bank transfers (including international), and Payoneer MasterCard.Geo: 2Checkout is available in over 200 markets and offers 87 currency options as well as 15 languages. Security: Because 2Checkout offers a hosted payment gateway option, all security will be taken care of by them. PCI compliance and fraud protection are covered. Get the Extension
Bonus: Stripe vs Braintree
Braintree and Stripe are 2 of the best payment gateways for ecommerce. They’re easy to set up, easy to use, and they just work. When considering Braintree and Stripe for WooCommerce, it’s worth noting a few things:
- Both accept payments from all major credit and debit cards
- Braintree and Stripe both accept Apple Pay and Android Pay
- Both offer recurring billing
- Stripe and Braintree refund the fees to your customer when you refund a purchase
Stripe vs Braintree - the differences
Braintree allows you to accept Paypal whereas Stripe doesn’tStripe allows you to accept Alipay, whereas Braintree doesn't.Of course, when looking at the Braintree vs Stripe battle in close detail, there are a lot of differences that will affect your decision. At the end of the day, the winner depends on the type of business you run and what your customers prefer, not necessarily what you prefer.
How to Set Up a WooCommerce Payment Gateway
What’s nice about using WooCommerce extensions to power a payment gateway is that they almost always have a WordPress payment plugin attached to them. Without a direct integration with WooCommerce, you may have to deal with configuring APIs, plugin conflicts, as well as other issues that could keep the gateway from seamlessly integrating with your site. Thankfully, though, there are many WooCommerce payment gateways that work right within the platform. For example, Stripe has one and it’s called WooCommerce Stripe Payment Gateway.

Using this free payment gateway extension and plugin, let’s quickly walk through the process of setting up a payment gateway in WooCommerce. Step 1Log into your WordPress dashboard. Navigate to Plugins > Add New.

Locate the Stripe plugin. Click the Install Now button and then hit Activate. Step 2 Sign up for a Stripe account.

Once you’ve activated your account and configured all your settings, return to WordPress. Step 3Under your WooCommerce settings, you will now see various options for Stripe Checkouts (in addition to the default checkout options WooCommerce gives its users).

Stripe settings enable you to activate Stripe checkout, and then customize things like the look and messaging in checkout, activation of customer account saves, and so on. The other Stripe settings pertain to the various countries in which they are accepted. If you have users in countries like Belgium (Bancontact), Germany (Giropay), China (Alipay), or you simply want to allow for Bitcoin payments, you will have to activate each option separately.And that’s it! So long as you have a checkout page designated for your WooCommerce site under WooCommerce’s Checkout settings:

And you’ve enabled all of the payment gateways you want to be included in that checkout:
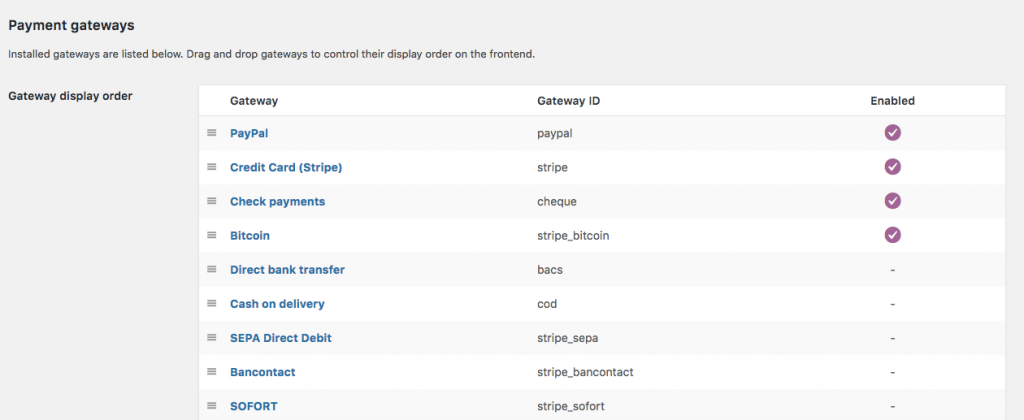
You are ready to start accepting payments for your store.
Wrapping Up
If your goal is to build a beautiful and high-performance digital storefront, you can’t do any better than building it with WordPress and WooCommerce. Of course, as we’ve seen, the default settings within each may not be ideal for your online store. However, there are extensions and plugins built to deal with any solution you might possibly need--especially something as delicate as processing customer payments. If you’re hoping to give your customers a stellar experience from the moment they enter your site until the time the payment has been processed, use WooCommerce along with one of the feature-packed WooCommerce payment gateway extensions above. In no time at all, you’ll have a fast, easy, and secure way to accept customer payments for your online business. So, now that you know more about WooCommerce payment gateways and how they work, do you feel more secure in using them in WooCommerce and WordPress? I’d love to hear your thoughts below!
przeczytaj także
What’s a Rich Text element?
The rich text element allows you to create and format headings, paragraphs, blockquotes, images, and video all in one place instead of having to add and format them individually. Just double-click and easily create content.
Static and dynamic content editing
A rich text element can be used with static or dynamic content. For static content, just drop it into any page and begin editing. For dynamic content, add a rich text field to any collection and then connect a rich text element to that field in the settings panel. Voila!
How to customize formatting for each rich text
Headings, paragraphs, blockquotes, figures, images, and figure captions can all be styled after a class is added to the rich text element using the "When inside of" nested selector system.

![Product feed tips for your online store to boost profits + sales [how-to]](https://cdn.prod.website-files.com/61c2fe5939d339761cefc871/61cc47c5ab837abde2e3e429_how_a_product_feed.jpeg)


